Load–power profile chart
Mechanical power output across the working load range, plotted in watts. The parabolic shape peaks at an intermediate load — typically 30–50 % 1RM for the squat.
Power = force × velocity. Force rises with load; velocity falls. The product peaks somewhere in the middle of the load range — typically around 30–50 % 1RM for most lifts. This chart plots the parabolic best-fit through measured load + power pairs from an athlete’s working sets, with the peak load and peak power both readable directly off the curve.
Because it’s in absolute watts — not normalised to % of peak — you can track real progress over time: the height of the curve is power output, the position of the peak is the load where that output happens. Both move with training, and tracking either is more honest than tracking a single max-effort attempt.
How to read this chart
X-axis is load (the bar weight you actually lifted, or % of 1RM). Y-axis is power output in watts. The curve is parabolic: at light loads there’s little to produce power against, at near-maximal loads the bar barely moves, and somewhere between the lifter is producing the most watts they’re capable of.
In the squat, the peak usually lands in the 30–50 % 1RM range. Bench is similar. Deadlift sits a little higher (50–70 %). Where exactly your peak falls depends on your strength-vs-speed bias, the lift’s biomechanics, and how power is being measured.
When to use it
- Programming dynamic-effort / power blocks. Load near the peak-power region, focus on bar speed, train rate of force development.
- Comparing athletes. Two lifters with the same 1RM can have very different peak-power loads; that bias tells you who is “speed-strong” vs “force-strong”.
- Reading readiness. A drop in measured watts at the same load is one of the earliest signs of accumulated fatigue.
Common variations
The curve stays parabolic, but its location and height both move:
- Strength-biased lifters → peak shifts right, closer to 50 % 1RM.
- Speed-biased lifters → peak shifts left, closer to 30 %.
- Squat curves are flattest, deadlifts the steepest, bench in the middle. Olympic lifts peak further right because their movement dynamics differ fundamentally.
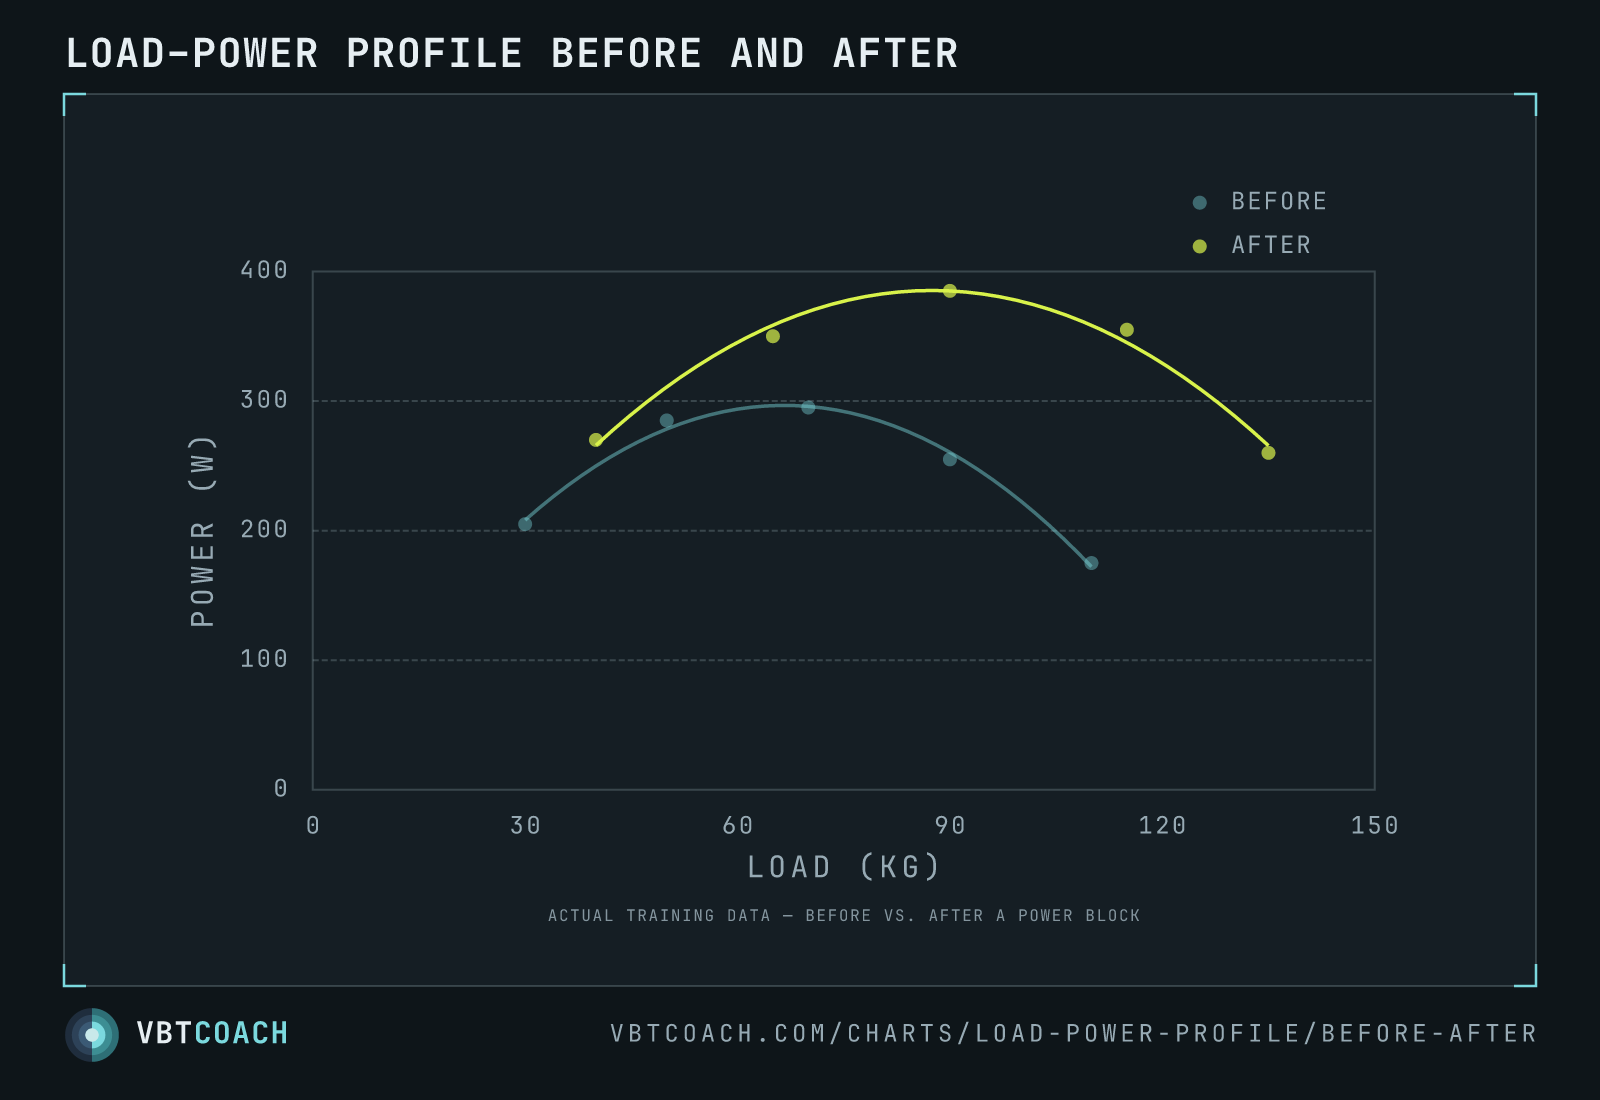
- Before-and-after — overlay the same athlete’s curve months apart. A power-focused block lifts the whole curve (more watts) and can shift the peak’s position; that longitudinal view is the clearest signal that the block worked.
Pitfalls
- Confusing peak power with optimal training load. Peak-power load is the output metric; the optimal training load depends on the goal. For max strength, train heavier than peak-power. For sport-specific RFD, train near it.
- Conflating mean and peak power. Peak instantaneous power happens during the acceleration phase; mean power averages over the whole rep. Different metrics, different curves, different peak loads — pick one and stay consistent.
- Assuming the curve is stable. Peak-power load and output shift with training; re-test every 4–6 weeks so you’re reading current data, not history.
Where to go next
Find your personal peak-power load with the Max power calculator. Pair this chart with the Load–velocity profile — peak power lives at the intersection of “load × velocity” along that line.
Download high res chart images
Every chart on this page as a high-resolution PNG — 2 exports, 1600×1000, watermarked. Free to share, embed in slides, or print. Credit appreciated.